
Welcome back, adHOMies, to adHOME’s Guide To Geofencing Pt. 2: Finding The Fence. If you haven’t checked out Pt. 1 – Why Geo-fence? you can give it a read right here → HERE ←
Now that you’re an expert on why you should add geo-targeting to your ad strategy, that info is a little useless if you’re unfamiliar with how to apply location targeting. In adHOME’s Guide to Geofencing Part 2: Finding The Fence, we will talk about where to find location setting across 6 of the top social platform–Facebook, Instagram, Twitter, Snapchat, Google and YouTube–and a few key features, like narrowing your radius, excluding locations, and bulk uploads.
Setting Up Geofences
Facebook/Instagram
Let’s start with 2 platforms that most of us use nearly every day: Facebook and Instagram. You may be wondering why we’re lumping them together, lucky for us Instagram is now a part of Facebook, which means we can set location targeting for both platforms at the same time.
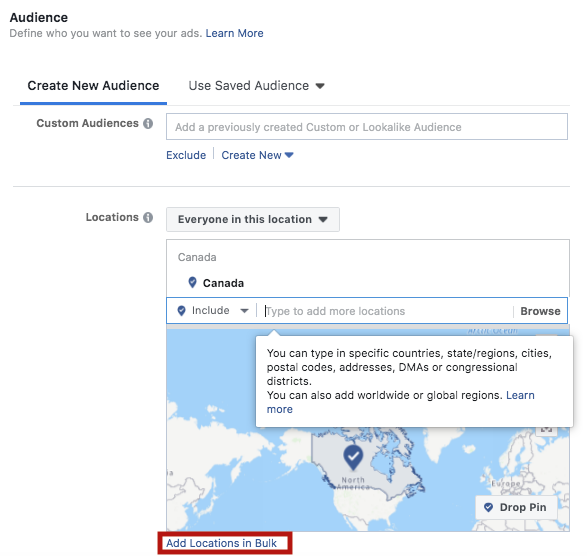 For Facebook and Instagram, find Location settings in the Ad Set builder. In the search bar, type the city, country, province, DMA, or congressional district you would like to target and select it.
You will know the location has been successfully added to your targeting when a pin icon appears on the map and/or a border–or fence–is drawn around the selected location, and when the location name appears above the search bar.
To exclude a location, follow these same process but this time change the Include section to Exclude! Pretty simple right?
To narrow your geo-fence, you can choose a radius between 10-50 miles around your desired location; or if you’re targeting a city you can choose the option to target City Only, which will remove all radius around the targeted location.
Have a long list of locations to upload all at once? Don’t worry, you can upload multiple countries, regions/states, DMAs, cities, postal codes, or addresses at one time by using the Bulk Upload option located below the map.
Now that you are familiar with location targeting and exclusions, narrowing the radius, and bulk uploads for Facebook and Instagram, let’s dig a little deeper and jump into Twitter.
Recently, Twitter Ads underwent an update that lumped their location settings in with a bunch of other targeting options. To find Twitter location targeting, head over to your Ad Group and look under Select Location, Language, Technology. At the very bottom of the list, you will location-based targeting.
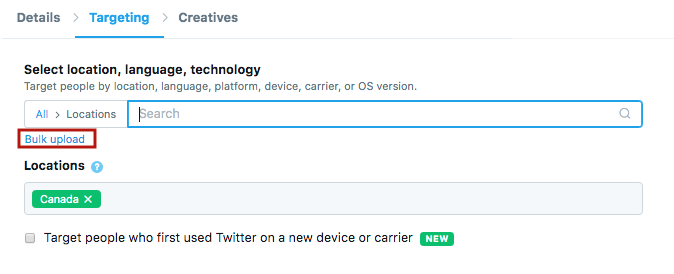 From here, you can either select locations in the dropdown menu or start typing in a city, country, state, metro area, or postal code that you would like to target.
You will know the location has been successfully added when it appears below the search bar. Unfortunately, though, Twitter does not have a location exclusion option at this time.
But! Just like Facebook and Instagram, Twitter has a Bulk Upload option located below the search bar, where you can upload multiple city names, countries, states, metro areas, or postal codes at one time (only 1 location per line.)
Friendly Tip: where Facebook and Instagram targeting save automatically, Twitter does not. So don’t forget to actually save your targeting selections or else you will have to start over again.
Now that you’re an expert on adding location targeting to Facebook, Instagram, and Twitter let’s look at a less known platform: Google Ads.
Google Ads
For Google Ads, location-based setting can be a little more complicated, especially if you’re looking to do more advanced Location targeting. The good news is, Google Ads allows you to geofence on search, display, and YouTube campaigns!
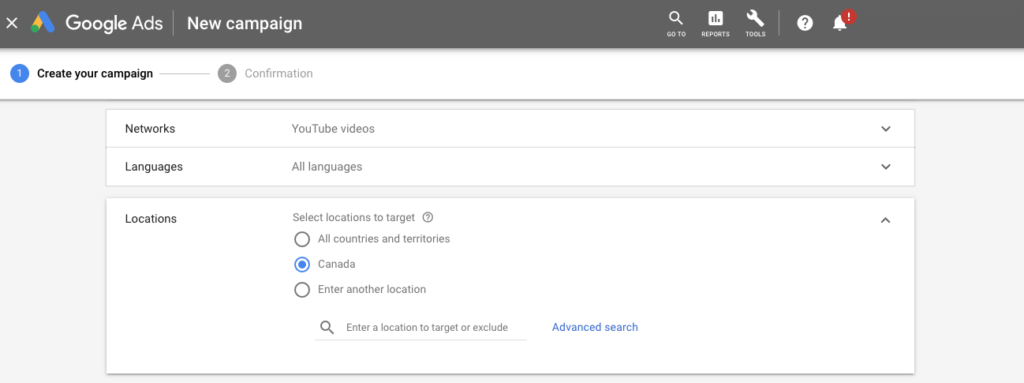 Like Facebook, Instagram, and Twitter find location setting in the targeting section of your campaign build.
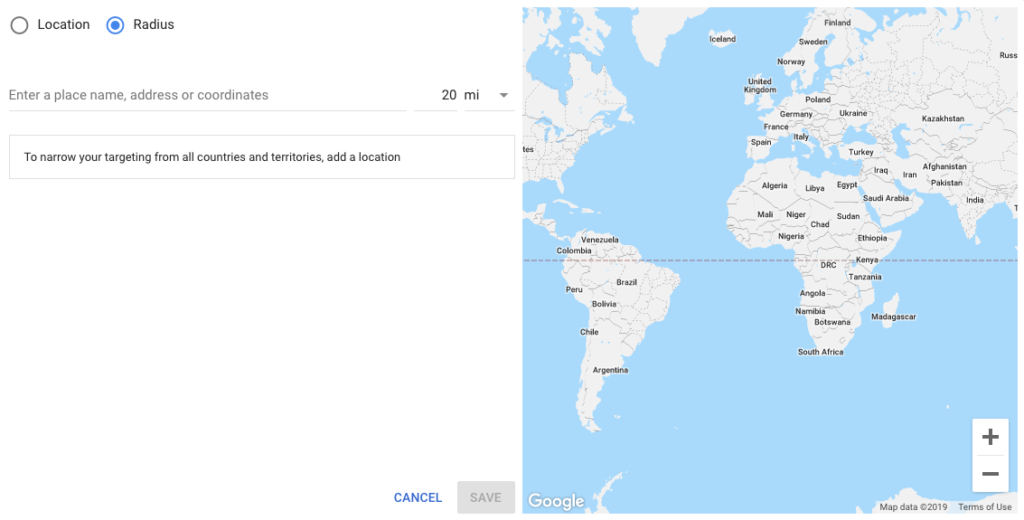
Initially, you will find 3 geo-targeting options: All Countries and Territories, Canada (or respective country, if supported), and Enter Another Location.
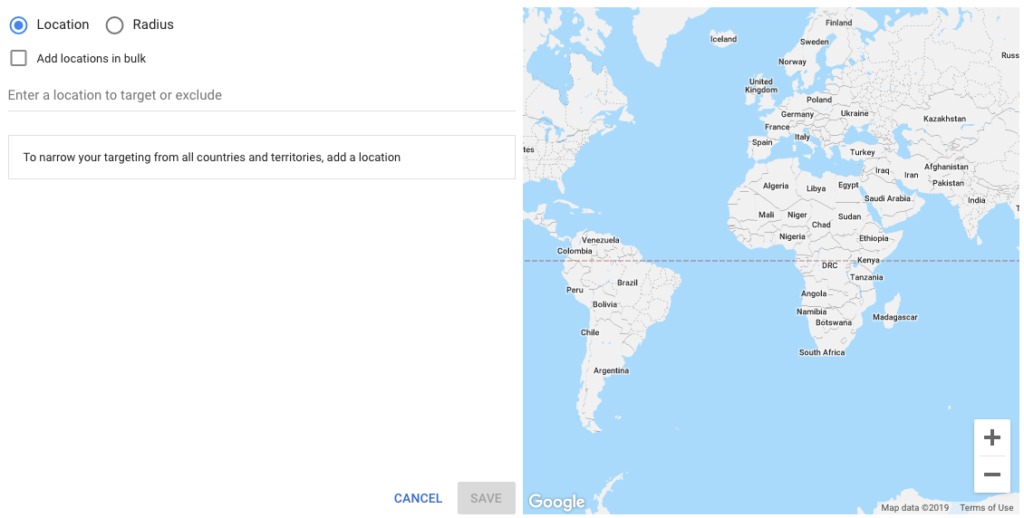
If you’re looking for something a little more advanced, don’t worry, there are more location options–like Radius adjusting and Bulk Uploads–in the Advanced Search area. If you select Advanced Search, you will have 2 options to choose from: Location and Radius.
In Location, you can target via name, address, postal code, or coordinates, unlike Enter Another Location where you only choose from other Countries. This is also where you will find the Bulk Uploads option (only 1 location per line).
With Radius, you can target a specific location and the desired radius (either in kilometres or miles) around it.
Well, so far we’ve covered Facebook, Instagram, Twitter, and Google Ads that include YouTube. Ready to move on to the final platform we will be teaching you about today? Filter out the world around you get ready to Snapchat it!
Snapchat
On Snapchat, there are a few ways to run a campaign. Today, we will look at the 2 major ad placements on Snapchat–Create Your Own and Snap Ads–and how to find and use their Location settings on each.
Ads
Let’s start with Snapchat Ads. Snap Ads Location targeting does differ from the other platforms we’ve covered. To start, Snap ads first has you  select the Country that you would like to target, then it allows you to choose between 3 options: Metros, Region, and Postal Codes. Once you’ve selected one of these to target, you can choose the specific location you would like to target by selecting it from the last dropdown.
But, just like Facebook, Instagram, and Google Ads you can narrow or expand your Location targeting by adding a radius around the Metro, region, or postal code you’ve selected.
Unfortunately, Snapchat does not have a bulk upload option for Snap Ads at this time.
Create Your Own
As for the Create Your Own ads, you will need Snapchat studio/create access because this is where you would create your own Snapchat Filter or Lens.
Unlike every other platform and ad type, we’ve dealt with so far, Create Your Own has a stand-alone geo-fence builder. Once you’ve set up your initial campaign details for your filter or lens, the next step is to define the area(s) where you’d like your creation to be shown.
On the Location page–follow the setup process step-by-step and you’ll make it to this page eventually–you will be shown a large map where you can either type into the search bar the country, city, postal code, address you wish to target; or, you can draw the fence yourself.
To create custom geofences, use the Draw Fence tool. Once you select it, start creating your geo-fence by clicking where you’d like to place it. These geofences do not need to be perfect circles or squares or rectangles, Snapchat gives you the freedom to really map out the dimensions you want.
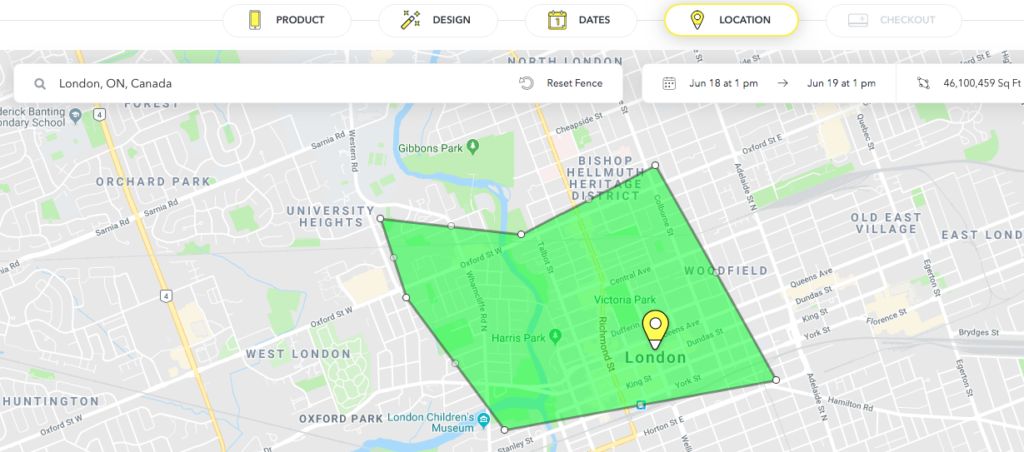
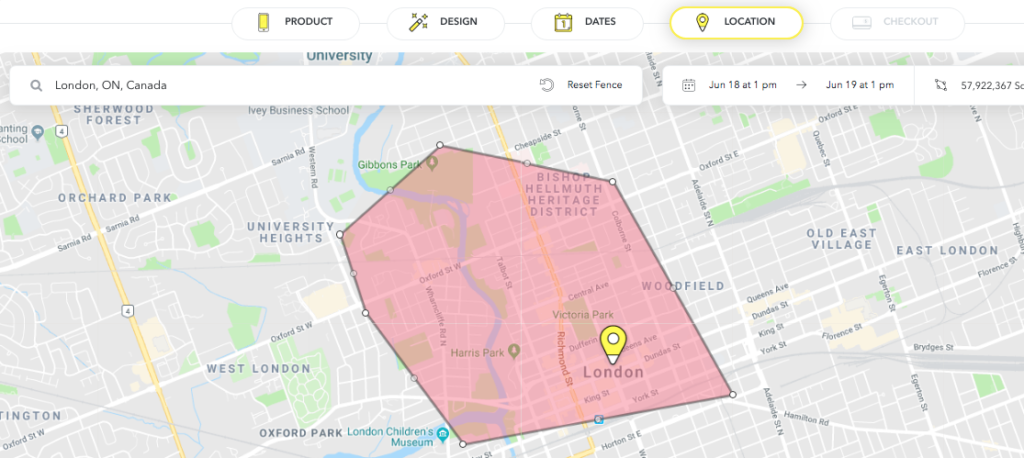
Just be cautious as the geofence you create must be under 50,000,000 square feet… Or else your geofence will go from green (good) to red (bab) meaning you won’t be able to use it.
Friendly Tip: Location targeting your Filter or Lens is what costs money, and how much you pay depends on how much distance you’d like to cover, the area you’re covering (if it’s high traffic you will pay more), and if there are any special events happening in that area at that time. So, for example, you’re going to pay a lot more for a geofence targeting a concert in a high traffic area around St. Patrick’s Day, than you would if you were to target a busy, local street, on an average Tuesday.
For Create Your Own, Snapchat does not give you a location exclusion option, but there is a bulk upload option.
The Bulk Upload in Create Your Own, though, can be quite time consuming and often complicated; but the plus side of the Bulk Upload is that Snapchat saves your list, so you have the option to reuse the previous uploaded bulk locations list for future creations. You can even edit and add additional locations to your list to prevent from having to upload a whole new one.
Well, that’s it! I mean… we talked about a lot today, covering location setting across 6 top social platforms–Facebook, Instagram, Twitter, Snapchat, Google and YouTube–and a few of their key Location targeting features, like narrowing your radius, excluding locations, and bulk uploads.
Feel a little overwhelmed? Don’t worry, adHOME Creative is here to help. Give us a call or send us an email if you and your business ever need help with traditional or digital advertising needs.